Finally starting to build the corner cabinet!
I love starting a project because all the planning and thinking that’s been floating around finally starts to turn into a physical object. Everything is starting to come together!
The first step after demo was the basic frame for the cabinet. Because we’ll be painting this cabinet white when it’s finished I chose to make everything out of medium density fiberboard, or MDF. MDF is basically just pressed together sawdust, which may not sound too appealing, but it’s really nice for some things. First of all it’s cheap. A 4 x 8 sheet of 3/4″ MDF is like $35, compared to a 4×8 sheet of 3/4″ plywood which is about $50. $15 may not sound like a whole lot, but we bought 5 sheets, that’s $65 saved! Secondly, it’s flat. There is no warping with this stuff because it’s not natural, it’s made to be flat, so it’s easy to get long straight sections. Thirdly, it’s easy to work with. Because there is no grain, it doesn’t crack or split like normal wood, which makes it easy to cut and easy to build with. Lastly, it paints really well! Because it’s so flat it’s really easy to get a nicely painted surface with it. I’ve painted MDF before and I’m always amazed with how nicely it turns out.
All that being said MDF sounds like the perfect material! Well, only for some things. It certainly won’t look good if you’re staining it. It’ll just be flat brown because, again, there’s no wood grain. The edges are also pretty fragile and dent/break fairly easily. Surprisingly enough, there isn’t a whole lot of structural integrity in saw dust…who knew. Screws also tend to strip out fairly easily during construction. Do yourself a favor and get some of the Spax screws that are made for MDF, they are amazing, really. It also makes a crazy amount of gross saw dust! It’s like this powder like stuff that gets everywhere. You’ll definitely want to have some sort of dust collection going on and wear a dust mask as it’s probably not good to breath this stuff in. I wore a mask for some of the sawing and routing and I was still blowing saw dust out of my nose the next day.
OK, let’s get on to the construction. Everything is 3/4″ MDF cut to size on a table saw or with a circular saw. The joints were all screwed together with those life saving Spax MDF screws and also glued together with some Liguid Nails. This thing is going to be pretty solid! First step, basic frame:

Corner Cabinet Frame
This is pretty simple, just basic flat panel MDF cut to size (remember to add in the thickness of the MDF at the joints!). Each side is screwed to the wall, directly into the studs, and the top is screwed to the ceiling. If you were making a standalone cabinet, you’d need to butt joint all the pieces together, but since ours is going to be permanently attached to the walls, this is all we needed to do. This is the part when we were amazed at how out of square and uneven our house is!

Corner Cabinet top
The next step was to add in the cleats at the bottom of each side. These will support the bottom shelf, which will be used as an attachment point for the front and little side panels.

Corner cabinet bottom shelf cleats
Next step, attaching the bottom shelf.

Corner cabinet bottom shelf, with outlet box
Pretty easy here, just cut the shelf and lay it on the cleats.

Corner cabinet outlet box
We’re also adding a light at the top of the cabinet, so we went ahead and added an outlet to the bottom shelf. Luckily, or unluckily, enough for us there were some holes drilled in our floor already. This hole goes down to the basement drop ceiling, where I can easily tie into an electrical box. Maybe all the strange renovations the previous owners did weren’t all that bad!

Corner cabinet outlet box
We can now also use this outlet to charge up cell phones and other gadgets that we want hidden from view, since it’ll be located inside the closed cabinet on the bottom.

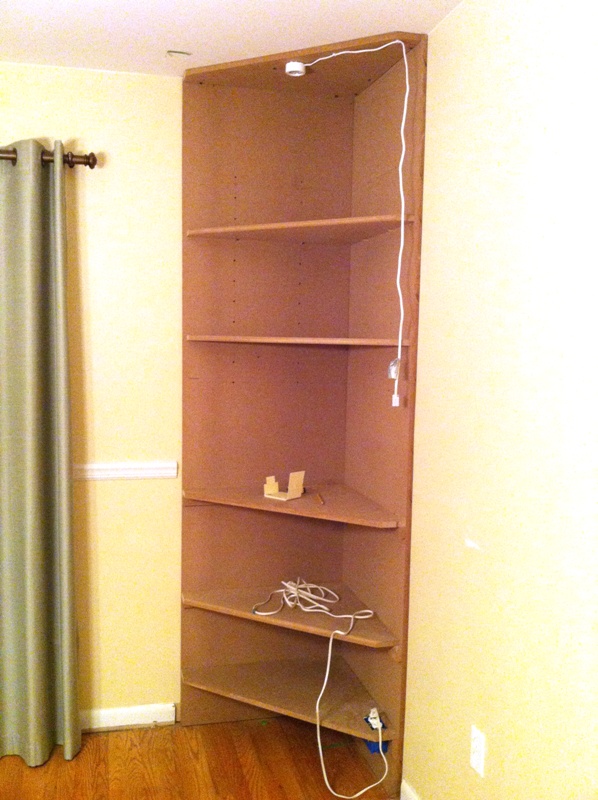
Corner cabinet middle shelf
Now it’s starting to come together! The middle shelf was also attached with cleats underneath. You won’t see these when it’s finished as they will be inside the cabinet.

Corner cabinet with shelves installed
Some more shelves added. Looking like a real cabinet now huh! The middle shelf at the bottom was added in the same way as the previous ones, cleats screwed to the frame, then shelf put on top and screwed down. The top two shelves are a little bit different.

Corner Cabinet Shelves
We weren’t sure which positions we wanted these in, so decided to make them adjustable. I drilled a bunch of holes to fit some small wooden plugs and the shelves just lay right on top of them. Pretty slick huh!?!

Corner cabinet adjustable shelf detail
I also routed the edge of both top shelves and the bottom middle shelf. These will be the edges that will show, so they needed to be pretty looking. They also needed to be nice and smooth, because the corners of cut MDF are sharp when painted!

Corner Cabinet Light
Last picture for the day I think. Just a standard little under cabinet halogen lamp from Home Depot. I think it was like $7? We’re hoping it’ll be bright enough up there, we’ll see.
SPAX International
Hi Tim and Elane!
We’ve enjoyed reading how you built the corner cabinet. Great that you used SPAX and recommend them. Whenever you have more projects with SPAX, please let us know on Facebook (facebook.com/SPAX). Best wishes, your SPAX Team